

Glassy Button Illustrator tutorial

This Tutorial will guide you with three simple steps, on how to make glassy button with Illustrator
1. Create a circle path and fill it with orange colour. Copy the circle and paste it in Front (use Ctrl + C and Ctrl+ F). Select the pasted circle and reduce its size, by dragging inward and place it slight below the centre point of the orange circle as shown in the figure.
2. Now select the Blend Tool , and click on the top edge of the yellow circle and then on the top edge of the orange circle. Instead, you can blend them by selecting both circles and then click on Object > Blend > Make (Ctrl+Alt+B).
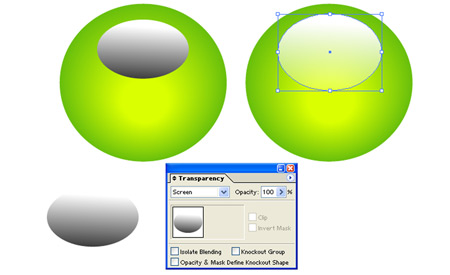
3. Now make an oval path and fill it with black & white Gradient. Place it on top of the circles. Select the oval path and then go to Transparency palate > Screen Blend Mode. OR click on Window > Transparency if your Transparency is not shown OR press Ctrl+Shift+F10.
Advantages
The advantages to create this glassy button with Illustrator than Photoshop are:
1. It is vector, hence scalable.
2. Less steps, hence easy and faster
3. Colours can be changed easily.